FAQ
Product Overview: U-Gel
U-Gel is a unique formula builder and extension gel used for gel overlays, soft gel tip extensions, backfills, rebalancing, and strengthening natural nails. It works as both a builder gel and an adhesive for soft gel tips within the Móng Úp Nail System.
U-Gel benefits other methods
Refill/backfill instead of full removal: With U-Gel you can maintain the set and just fill growth. Other is often treated like “remove + redo,” which can mean more frequent aggressive filing/soaking.
Better structure + apex control: U-Gel lets you build a clean apex and sidewalls on purpose. Other can get bulky fast, especially near cuticles, and structure is harder to perfect without lots of filing.
Smoother cuticle line: You can place, refine, then cure—so it’s easier to keep the cuticle area thin and neat. Other layers can creep thicker at the perimeter.
Less dust + less “grinding”: Other usually needs more heavy refining (and makes more powder dust). U-Gel can be shaped with less aggressive removal when applied cleanly.
More flexibility (less brittle feel): Other can feel rigid and may crack/chip with impact. U-Gel tends to have a more flexible wear, which many clients find more comfortable.
More consistent wear for overlays + extensions: U-Gel works as an overlay and as an extension/adhesion gel for tips in one system.
Cleaner removal path (when needed): With U-Gel, you can usually file down and leave a thin base, then refill—so removal isn’t a constant cycle.
U-Gel creates a thin protective layer over the natural nail, acting like a shield. It absorbs impact, reduces breakage, and helps protect the natural nail while allowing healthy nail growth underneath.
U-Gel is part of a complete nail enhancement system, not just a builder gel. It supports extensions, overlays, rebalancing, and protection — all in one product — making it versatile and cost-effective for salons and individual users.
Yes. U-Gel has self-leveling properties, which help create a smooth surface and clean structure. This makes application easier and reduces excessive filing.
Yes. U-Gel is ideal for gel overlays and backfills. It bonds well to existing product, allowing smooth rebalancing without removing the entire enhancement.
With proper prep and application, U-Gel can last 3–5 weeks without lifting. Longevity depends on nail prep, curing, and aftercare.
Application Techniques
This allows gravity to pull the gel to the center, creating a natural apex for better structure and strength.
Yes, especially when used with Móng Úp soft gel tips. It provides strong adhesion without bulk.
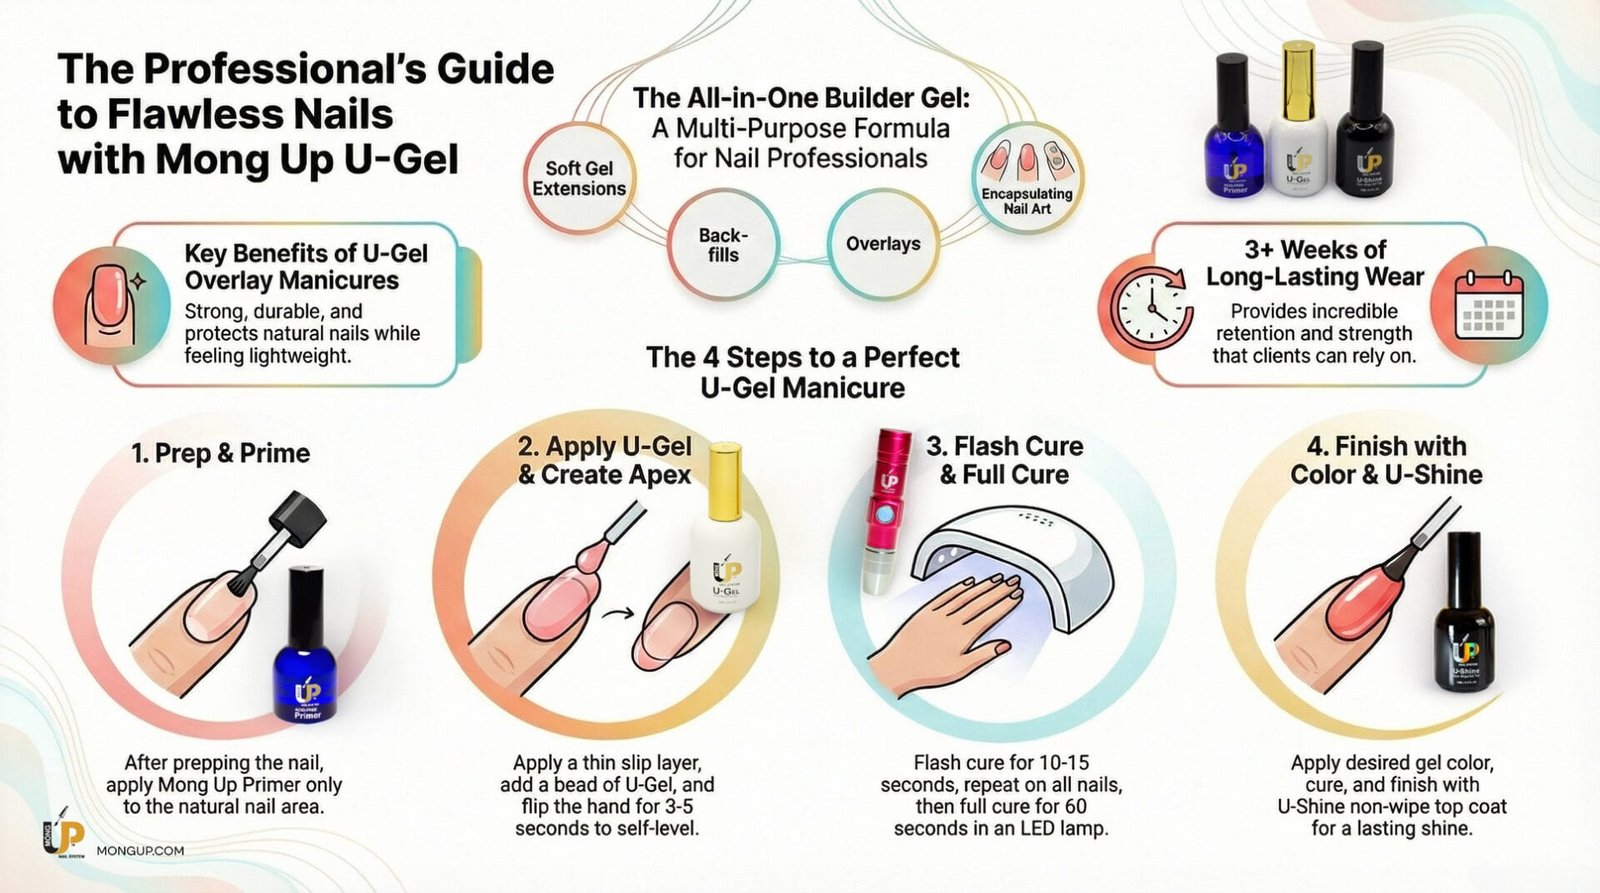
A gel overlay with U-Gel strengthens natural nails while keeping them lightweight and natural-looking. Follow these steps for best results:
Prep the natural nail
Push back cuticles, remove shine with a buffer, and cleanse the nail to remove dust and oils.Apply primer
Apply a thin layer of U-Bond non-acid primer to the natural nail and allow it to air dry. This acts like a double-tape to improves adhesion and reduces lifting.Apply a thin base layer of U-Gel
Brush on a very thin layer of U-Gel and gently work it close to the cuticle without touching the skin. Cure with a LED lamp for 10-15 seconds to freeze the gel.Build the overlay structure
Apply a second bead of U-Gel to build strength. Flip the finger upside down 3-5 seconds to allow gravity to create a natural apex.Repeat to the entire hand and cure fully for 60-90 seconds.
Refine if needed
Lightly file or buff to perfect the shape and smooth the surface.Apply color as desired. (cure for 60 seconds for each coat)
Seal with U-Shine top gel
Apply a U-Shine non-wipe top gel for shine and protection, then cure for 60-90 seconds.
Complete removal: It requires more filing and soaking, which can weaken natural nails over time.
Refilling: It preserves the protective base, reducing damage and supporting nail growth.
No. When the existing gel is properly maintained, it continues to act as a protective layer for your natural nails. Leaving it in place helps reduce unnecessary filing and soaking, which can weaken the natural nail over time.
Yes! With a skilled technician, refills keep your natural nails protected and healthy. You’ll have the same fresh look—without the repeated stress of full removal!
Refills (backfills) are recommended over full removal because they’re usually healthier for the natural nail, faster, and more consistent—as long as the set is still in good condition.
Protects the natural nail: You keep a thin “safety layer” of product, so you’re not repeatedly stripping the nail down.
Less over-filing: Full removal often leads to aggressive filing and accidental thinning; refills focus on lifting removal + rebalance instead.
Less acetone exposure: You avoid frequent full soak-offs, which can dry out nails and skin.
Maintains strength/structure: You can rebalance the apex and reinforce stress points rather than resetting everything.
Saves time and feels better: Clients usually experience less heat, less dust, and less trauma vs starting over every visit.
Full removal is better when: there’s major lifting, cracks, discoloration moisture, product breakdown, or the client wants a big length/shape change.
Primer
Primer is acting like a double tape used to improve adhesion between the natural nail and the U-Gel.
It works by removing excess moisture and oils from the nail surface, allowing U-Gel to bond more securely. This reduces lifting, peeling, and premature breakdown of the enhancement.
Key benefits of using U-Bond Primer:
Creates a stronger bond between the natural nail and U-Gel
Helps prevent lifting and chipping
Extends wear time (3–5 weeks with proper application)
Improves durability for overlays, extensions, and backfills
Especially important for oily or problematic nails
Primer is still recommended. Even dry nails contain natural oils that can affect adhesion. Primer creates a consistent bonding surface.
No. U-Bond is acid-free with a non-burn, low-exothermic formula designed for client comfort.
Builder gel, soft-gel extensions, and acrylic systems.
Curing & LED Lamp
Flash curing locks the gel structure in place gradually, improving comfort, control, and preventing gel movement before a full cure.
Flash curing in a swinging motion helps reduce heat spike and improves control during application.
When you swing the light back and forth instead of holding it directly over one spot, the gel begins to set gradually rather than curing all at once. This slows down polymerization, which minimizes heat sensation, even further than a standard flash cure.
Benefits of flash curing 5–10 seconds with a swinging motion:
Reduces heat spike discomfort
Prevents gel from shifting or flooding the cuticle
Locks the structure and apex in place
Ideal for sensitive or thin natural nails
Perfect for overlays, extensions, and building stages
After flash curing with Mong Up Flash cure LED, you can proceed with a full cure 60 sec once the gel is stabilized.
*Recommend 2-5 inches away when using Mong Up Flash Cure Light due to high intensity LED.
Heat spike is caused by rapid polymerization. By using thin layers, flash curing from 5-10 seconds in a swinging motion, and controlled structure, U-Gel remains comfortable while still delivering strong, long-lasting results.
Apply thinner layers of gel
Build structure in stages instead of one thick bead
Use flash curing before full curing
Use a swinging motion when flash curing to slow polymerization
Be extra gentle on thin or sensitive natural nails
Avoid over-filing the natural nail during prep
Yes, U-Gel is compatible with most UV and LED lamps, as long as the lamp meets the proper power and wavelength requirements.
For best results:
Use a UV/LED lamp with at least 36W or higher
Ensure the lamp emits 365–405 nm wavelength, which is standard for most gel systems
Cure according to recommended times (flash cure + full cure when needed)
Drill Bits & E-Files
Carbide bits are designed for product removal, not natural nails. Using them on natural nails can easily cause damage.
Why sanding bands or diamond bits are safer:
Gentler abrasion
Sanding bands and diamond bits remove surface shine without aggressively cutting into the nail plate.Better control
They allow precise, controlled prep, reducing the risk of thinning or over-filing the natural nail.Prevents nail damage
Carbide bits can create grooves, heat, or excessive thinning, leading to weak, sensitive nails.Ideal for prep work
Sanding bands (fine or medium grit) and diamond bits are perfect for removing shine, cleaning the cuticle area, and prepping for adhesion.Reduces heat and discomfort
Carbide bits generate more friction and heat, which can cause discomfort or damage on natural nails.
When to use carbide bits:
Carbide bits should be used only on artificial product (gel, acrylic, hard gel, soft gel tips) during removal or bulk reduction—never on the natural nail. Recommend keeping around 10% to avoid damage to the natural nails.
Carbide Bits
Best for: Artificial product removal
Made with sharp cutting flutes
Designed to cut and shave bulk product quickly
Used on gel, acrylic, hard gel, and builder gel
Available in fine, medium, and coarse, up to xx coarse grits
Not safe for natural nail contact
When to use:
Debulking extensions
Removing old product
Shortening enhancements
⚠️ Using carbide bits on natural nails can cause thinning, heat, and damage.
Diamond Bits
Best for: Natural nail and cuticle work
Coated with fine diamond grit
Designed to gently abrade, not cut
Excellent for cuticle prep and surface shine removal
Provides controlled, precise work
Safe for natural nails when used properly
When to use:
Nail prep
Cuticle cleaning
Sidewall detailing
Removing shine before gel application
others
How do I clean flooded gel over cuticle and sidewall?
If the gel is NOT cured yet
Stop immediately – do not cure the gel.
Use a clean brush or wooden stick to gently pull the gel away from the cuticle and sidewalls.
Wipe off excess gel from the skin with a lint-free wipe or alcohol pad.
Refine the cuticle area so there’s a small gap between gel and skin.
Flash cure (5–10 seconds) to lock the gel in place.
Proceed with a full cure only after the area is clean.
If the gel HAS been cured on the skin
Do not peel it off (this can tear skin or lift the enhancement).
Use a fine diamond bit or hand file to gently remove gel from the skin and cuticle area.
Lightly buff to smooth the edge and reseal with top gel if needed.
What is the purpose of flipping the finger upside down?
Flipping the finger 3-5 seconds allows gravity to pull the gel toward the center, helping form a natural apex. This creates better structure, balance, and strength while reducing the need for excessive filing.
What Causes Gel Lifting?
Gel lifting happens when the gel loses adhesion to the natural nail. The most common causes are related to prep, application, or aftercare.
Signs of Damaged Natural Nails
1. Thinning or soft nails
Nails feel weak, bend easily, or look overly flat. Often caused by excessive filing or frequent full removal
2. Peeling or layering
Edges split into layers or peel off. Indicates loss of natural nail structure
3. Splitting or cracking
Vertical or horizontal cracks. A sign the nail plate is stressed or dehydrated
4. White or chalky spots
Patchy, cloudy areas on the nail. Surface damage, not “fungus” in most cases
5. Sensitivity or soreness
Nails hurt when touched or during service. Nail plate has been overworked or overexposed
6. Poor retention
Product lifts easily or won’t stay on. The nail is compromised and can’t hold product well
How do you safely remove U-Gel?
To remove:
Lightly file off the top layer 80 – 90%
Apply acetone with wraps or cotton
Allow to soak until the gel softens
Gently push off without force
Proper removal helps protect the natural nail.
Is U-Gel safe for beginners?
It is recommend used by professional, but U-Gel can be used by beginners when instructions are followed correctly. Use thin layers, proper prep, correct curing times, and avoid skin contact. Beginners should start with overlays before attempting extensions.
Can U-Gel Be Removed with a Hand File?
Yes. U-Gel can be safely removed using a hand file when done correctly and patiently.
How to remove U-Gel with a hand file:
Start with the right grit
Use a 180–150 grit hand file to gently file down the top coat and bulk of the U-Gel. Do not use coarse grits.File in controlled motions
File evenly across the surface. Avoid sawing aggressively or staying in one spot too long.Stop before reaching the natural nail
Once you see a thin, slightly opaque layer of gel, stop filing. Do not file into the natural nail.Switch to soak-off (optional but recommended)
After bulk removal, you can soak off the remaining thin layer with acetone for easier, safer removal.Gently push off softened gel
Use an orangewood stick or pusher—never force product off.Buff and hydrate
Lightly buff, then apply cuticle oil to restore moisture.
Important tips:
Do not rush removal
Do not over-file
Never peel U-Gel off
Take breaks if hands feel warm or sensitive
Summary:
Hand filing is a safe removal method for U-Gel, especially for beginners, as long as you work slowly and protect the natural nail. This is a great option for at-home users who are not comfortable using an e-file yet.
I am a beginner. Can I use an e-file to remove gel?
Yes, beginners can use an e-file — but only with proper guidance, low speed, and the correct bits.
An e-file can make nail prep, refinement, and removal faster and cleaner, but misuse can cause damage. For beginners, control and safety are key.
Beginner common mistakes
Common mistakes for beginners include using thick layers, skipping prep, flooding the cuticle, under-curing, and rushing extensions without proper practice.
Disclaimer *
Disclaimer
The information provided on this website, including tips, tricks, tutorials, Q&A, and educational content, is intended for general informational and educational purposes only.
Application techniques, product usage, and results may vary based on individual skill level, health condition, nail condition, tools used, and adherence to proper procedures. Always follow product instructions carefully and use professional judgment when applying nail products.
Móng Úp Nail System is not responsible for misuse, improper application, allergic reactions, injuries, or damages resulting from the use of our products or from following any tips, techniques, or advice shared on this website.
If you are unsure about any step, technique, or product usage, or if discomfort or damage occurs, stop immediately and seek guidance from a licensed nail professional.
“By using this website and our products, you acknowledge and accept this disclaimer.”.
